
The Text Element is the primary element that allows you to enter written content throughout your website. Below is a comprehensive list of all the Text Element features.
In This Article:
- Adding a Text Element
- Formatting Options
- How to Insert a Link:
- How to Insert an Image:
- Edit Dropdown Menu
- View Dropdown Menu
- Insert Dropdown Menu
- Formats Dropdown Menu
- Adding Tables
- FAQ
Adding a Text Element
To add a Text Element, open Edit Mode and then click and drag the Text Element icon into a Content Area .
Formatting Options
Font Formats: Set a font format for your selected text. For example, Main Text, Heading 1, Heading2, etc.
Clear Formatting: Click to clear selected text of all formatting. Note: Style tags (P, H1, H2, etc) will remain after you clear the formatting.

Bold (B), Italic (I), Underline (U): Click to apply to selected text.

Align (Left, Center, Right, Justify): Click to align selected text or images. Note: If you align an image left or right, the text will float up against the image.

Insert/Edit Link and Unlink: Apply or remove a link from your selected text or image.
How to Insert a Link:
To insert a link, highlight your text or image then click the Insert/Edit Link icon ( ). In the pop-up window that appears, add in your link to the URL field then click Ok. Please is an example link
Note: When linking to an internal page of your website, the full URL is not required. You will just need everything after the '.com'. Links to external websites require the full URL. If you are linking to an external website, make sure to set the Target to 'New Window'. This will make the link open in a new tab of the user's browser when clicked on. This is a general best web practice for external links.

Additional guides on inserting a link:
- Video - Inserting a Link
- Video - How to create a button with a link
- Inserting a link to a PDF/Document
Paste As Text: If you copy text from an external program and paste it into the Text Element, the styling of your copied text will not transfer over. Note: By default, this option is turned on. If you would like to retain the styling of your text when pasted in, turn this icon off by clicking on it so it's no longer highlighted. This option is turned on by default as most stylings from other documents are not in a web-friendly font or format.

Bullet and Number List: Click to insert a number or bullet list. If you click the small down arrow next to each icon, you can select different styles.

Color: Click to apply a text or background color behind the text

Both the Text and Background Color icons open a color picker that displays basic color options. You can also apply your own custom color by clicking Custom. Under Custom, you can enter in a Hex Color Code (#000000) or an RGB Color Code (0,0,0).


Insert/Edit Image: Click to insert an image from the File Manager.

How to Insert an Image:
How to insert an image:
- Click to place your cursor within your content to where you want the image to appear.
- Click on the Insert/Edit Image icon which will open up another window.
- Here, click on the Finder icon that is to the right of the Source field.

- This will open up your website's File Manager in which you can upload and select an image.

- Once an image is selected, click Accept at the very top right.

- The same window from step #3 will appear again. Here, you can adjust other properties of the image.
Image Description: This field allows you to assign an Alt Tag to your image. An Alt Tag is used to assign SEO (Search Engine Optimization) value to the image.
Image Title: This field allows you to assign a Title Tag to the image. When a user hovers over an image, the Title Tag will appear after a few seconds.
Dimensions: This field allows you to adjust the overall dimensions of an image. The first box is the Width and the second box is the Height. You can assign a pixel or a percentage value. Note: If you add percent, please include the % symbol, for example, 100%. If using a pixel value, just include the number.
Class: This field is not currently utilized at this time.
- Click Ok
- Make sure to click Save Changes to save the element
Additional guides on inserting an image
Horizontal Line: Click to insert a simple horizontal line to help divide the text.
Source Code: This is an advanced feature to access the HTML coding of just this Text Element. This feature is very helpful if you need to copy the content of a Text Element and retain the styling to either duplicate it or move it to another page. Here is a helpful overview guide on duplicating a Text Element.

Show Blocks: After activating 'Show Blocks' you will see a gray, dashed line around each 'Block' of text to indicate which Style Tag is currently applied. (P = MainText, H1=Heading1, etc).


Edit Dropdown Menu

Undo: Undoes the previous action
Redo: Puts back the previous deletion
Cut: Cut the selected area from your style editor
Copy: Copy the selected area from your style editor
Select All: Select all in your style editor
Find and Replace: Find and replace something in the style editor
Clear Formatting: the Clear selected area of all formatting but leave the base style tag (same as above).
View Dropdown Menu
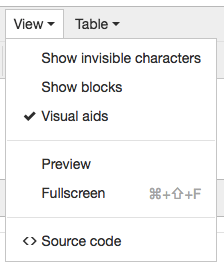
Show invisible characters: Display hidden characters, such as blank spaces. (Great trick to find where extra spaces are coming from.)
Show blocks: Highlight text in a faint grey background to indicate the style tag applied. To learn more about this feature, please see our guide here.
Visual aids: When enabled, tables inserted without a border will have a dotted line to help indicate where the table is.
Preview: Popups a window to preview the text
Fullscreen: Expand the window to be full screen.
Source code: This is an advanced feature to access the HTML coding of just this Text Element. (Same as the source code icon above.)
Insert Dropdown Menu
 Image: Browse your directory to insert an image.
Media: This option allows you to insert a video, such as one from YouTube
Link: Insert a link to the selected text
Page Break: Inserts a page break
Horizontal Line: Adds a horizontal line (same as the Horizontal line icon).
Special Character: Select from a huge assortment of special characters you want to include in your text
Anchor: Add an HTML anchor. Please see our guide here on how to add an anchor.
Insert date/time: Select a time to add
Nonbreaking space: Adds an HTML space
Formats Dropdown Menu

Styles: Apply a custom style tag, such as Title 1 to Title 6, to your selected text.
Transform: Set your selected text to be all UPPERCASE or lowercase.
Inline: Another quick way to apply Bold, Italicize, underline, strikethrough, superscript, or subscript your selected text.
Strikethrough / Subscript / Subscript: Format your text to have a strikethrough, Superscript, Subscript
Font Family: Apply a font family to your selected text. Note: Each font name is also displayed in the font family to help provide a quick preview.
Font Size: Apply a font size to your selected text.
Adding Tables
Tables can be inserted to help organize your text and/or images inside a Text Element. To insert a table, hover over the Table and select the table size you wish to create.

Once a table is created, you can use the icons that appear below the table to add and remove columns/rows. The action is based on the current table cell you are clicked into.
Under the Table dropdown, you can also select Table Properties to adjust the dimensions, add a border, add colors, and much more.
 Note: Tables with a set pixel width may not appear well on mobile devices due to the limited screen sizes.
FAQ
Is there a built-in spell checker?
Text will be underlined with a red squiggly line if misspelled. Right-click the text to see recommendations for the correct spelling.
Can I make the Text Element window bigger?
Click and drag the half-dotted triangle in the lower left-hand corner to expand the Text Element window

Can I upload or use other font families?
Additional font families can not be uploaded at this time.